The Studeblogger

Saturday, September 30, 2006

Fully regulated.

Well, I feel pretty good today because my son and I changed out the old, broken window regulator in the driver's door with a "new" used regulator procured from eBay. (This is one of the things that my wife wanted fixed immediately, and now I can check it off! It was also a major annoyance.)

Window regulators are one of those items which are no longer produced for these cars, and the cost of rebuilding one is a little steep: $175 is the going rate from Studebaker International (and that after a refundable core charge for your old regulator). Luckily, I got mine off eBay for $55.

The thing that usually goes wrong with these regulators is that the heavy spiral spring that pushes the regulator UP eventually breaks, and the window shoots to the bottom of its channel. There are other things that can happen to them, but that's the most common.

Since we bought the car, the driver's window has been held up with a mini-bungee cord between the window crank and the door latch release. Definitely an annoyance.

First thing we had to do was to remove the door trim panel. To do this, you have to first remove the handles; Studebaker uses the GM-style U-clips in the handles that snap into a channel machined into the splined crank shafts. This requires a special regulator clip removal tool that can be found at any good automotive paint store or NAPA. You just run it between the handle and the door and presto! the retaining clip is pushed back and the handle releases.

Once the trim panel is off, you have to lower the window (not a problem in this case!) and disengage the two nylon rollers that run in the window lift channel from the posts on the regulator. You can access the lift channel in the large access hole at the bottom of the door when the window is at its lowest position. Unfortunately, you can't see the rollers in the picture here, but they are held to their posts with more little wire U-clips; a set of long-nose pliers is a handy tool to have here. I found that only one of the rollers was still intact and clipped to its post; the other had self-destructed and its remnants were clinging to the post as best they could.

Once the rollers are free from the regulator, you must lift the window to the top of the door and secure it in the "up" position. A couple or three strips of duct tape around the top of the door frame did the trick for us.

The forward glass run channel that the window rides in is secured on top of the regulator's mounting position, so it has to be loosened and gently pushed forward (toward the door's outer skin) in order for the regulator's crank shaft to come inward and clear its hole. If you follow the vent window divider down the door, you'll find two big bolts with lock washers (the old-fashioned kind with four teeth) on a diagonal plane above and below the regulator and its four mounting bolts. Remove them both.

You can now remove the four regulator mounting bolts. The regulator will be free in the door, but will stay where it is because it's held in place by the glass run channel. You'll need to reach through the access hole and gently push the run channel outward, freeing the regulator's crank shaft. You can now let the regulator rest in the bottom of the door.

With the regulator in the "down" position (you left it down after disconnecting the nylon rollers, right?) it's pretty much a long rectangular shape. Grab hold of the end with the spring (the end away from the crank) and tilt it up through the access hole. A little wiggling and the large sector gear and crank assembly will clear the hole and out she comes.

Now you've come to the point in the project where you get to take a break, crack a beer and marvel at the stupidity of the car's previous owner! Laugh at the way he mutilated the inner door panel for no discernable reason. Check out the homebrew regulator repair and marvel that the thing worked even as well as it did!

Here's a "before and after" shot, of a sort. On top, you can see the "new" regulator, all lubed with white lithium grease and ready to go. Notice the new orange nylon roller test-fitted to the riser arm.

On the bottom, check out the old regulator as it came out of the door. Notice anything different? It's the same part, from the same year car, but something's strange... what could it be?

Well, two things are apparent, actually. First, notice the big, globby welds around the sector gear assembly. Apparently, the crank shaft bearing had broken loose from its mounting plate sometime in the past 43 years, and the PO attempted to weld it back together. Well, I guess I could be more charitable: they did weld it back together. But it sure ain't pretty. Those big globs of weld are on both sides of the assembly. Crude, but effective, I guess. Sure ugly as sin, though.

But that's not the big thing. Look at the springs. Notice the direction in which the one on the old regulator (on the right) is installed. Now notice the direction of the spring on the new part (on the left). That's right! The spring on the old part is installed backward!

Yes, when the PO took this regulator apart for service, he installed the lift spring in the wrong direction! And because the direction of the spring was reversed, it was actually pushing the window down instead of up!

I suppose, if I'd pulled the part and looked at it before I bought a replacement, I might have sussed this out and saved the cash, but having nothing with which to compare it, maybe I wouldn't have. In any case, the replacement regulator is in much better shape than the old one, so I consider it money well spent. And now I have a spare I can rebuild if need be.

Okay, now that you've finished laughing, it's time to put the new part back in the door. Installation, as the story goes, is pretty much the same as removal.

You will most likely have to replace the old regulator seal, which was made of a foam-type rubber and most likely is now the consistency of sand, if it's even left intact. Clean the area around the regulator crank shaft and slip one of these on the shaft. (I found that Stude Int'l doesn't carry this part, but that SASCO does; its original part number was 310844, but the new number is 770097; you can poke in either in SASCO's online database. They cost a buck each; order twice as many as you think you'll need because the regulator spacer that goes on the shaft between the handle escutcheon and the door panel is no longer available; this part however will slot right in.

There are two little felt anti-rattle washers that go on the regulator posts before the nylon rollers attach to them; these are part number 1355098 and are also available from SASCO for a buck each. The "new" regulator I bought had two of these between the roller and the regulator, but the shop manual only shows one and that's how I went. Slot these on the posts and put the new regulator into the door, tilting it through the large access hole the way the old one came out. Then put your arm through the small access hole and push the glass run channel forward again; maneuver the regulator crank shaft into its hole and release the run channel. Put the run channel bolts in but do not tighten them yet.

Reinstall the four regulator bolts and tighten them down.

The reason you didn't tighten the glass run channel bolts is that there's a good chance, with all of that shoving of the channel, that the forward edge of the door glass is no longer within the channel. Put the window crank back on the regulator shaft and lower the regulator all the way down. Now you can peel the duct tape from the window and gently lower it into the door, where the lift channel will rest against the regulator lift posts. Look down into the top of the door and make sure the glass is inside the run channel. When you're sure it's seated properly, tighten the two glass run channel bolts.

Now, you can install a new set of nylon rollers. These come as a set with their U-clips from Studebaker International. First, slide the old ones out of the run channel; marvel at how crusty and deformed they are and look at the old honey-colored grease globs that cling tightly to them. Make sure the clips are fully engaged on the new rollers, then slide one in each end of the lift channel. Push the lift channel outward a little and engage the rollers on the regulator riser shafts; pull the glass firmly toward the regulator and the clips will engage the shafts with a delicate little click.

At this point, you may need to adjust the regulator to make sure the window glass is level. See that bolt showing through the hole in the door about 5" below the regulator crank shaft? That's the adjusting bolt. If the window glass is tilted in the frame, loosen this bolt slightly and, using a flat-bladed screwdriver, push the bolt gently to level the glass. Pushing the adjuster toward the rear of the door will raise the trailing edge of the glass; pushing it toward the front of the door will lower the trailing edge. Level it by eyeball and then tighten the adjuster back up (don't overtorque it or else the window will bind.)

Now you can test your new regulator and be really pleased that the window once again stays in any position you put it in! Woot!

This is a good time to clean out any crud that might be inside the door. Usually there's a small pile of junk in the door bottom; clean out anything you find and make sure that the two door drains (front and rear) are open; clogged drains will lead to doorskin rust pretty quickly. Also, chances are that the plastic tape that originally sealed the access holes in the door is long gone; get some 5-mil plastic sheeting ($5 a roll at Wal-Mart) and cut some pieces to fit the holes. Use 3M Weatherstrip Adhesive or Strip-Calk (my favorite!) to adhere the plastic to the door and put the door panel back on.

Now you can reinstall the window crank and latch handle. Our car was missing the trim escutcheons that are supposed to go between the handles and door panels, so I got a repro set from studebakerparts.com , part number 1333574. The regulator spacer I mentioned above (that's no longer available) is supposed to fit between these and the door panel, but as I mentioned, the regulator seal #310844 fits perfectly. Put one set of these on the regulator crank and the other set on the latch shaft. Reset the clips on the cranks and snap the latch handle back on; there's one more part needed before you reinstall the window crank: a slick plastic separator that keeps the crank from biting into and destroying the escutcheon as it rotates. The parts manual shows a part number of 1334393, but it's been superseded by 1312647, which is available from all three suppliers. Put this on top of the escutcheon and snap the crank handle onto the shaft.

Now's a good time to lubricate the window run channels, while we're at it. Lower the window, take some graphite spray and apply it to the front and rear glass run channels. Crank the window up and down a few time to distribute the lube.

Voila! You're done. Stand back and enjoy the fact that your windows now operate properly, and that you don't need that bungee to keep the window up anymore, then go wash all the old grease and other assorted crap from your hands. Revel in a job well done.
Labels: ,

Monday, September 25, 2006

Nice article.

Found this great article from the Saint Louis Post-Dispatch about the Studebaker Lark and it's mission to save the company. Very interesting read, even if it is only newspaper-length. Check it out here.

Labels:

Thursday, September 21, 2006

Lube me, baby.

I've gotten the parts I needed to rebuild the driver's side window regulator in my Studebaker, and will post the proceedure here soon as I take the pix. In the meantime, I searched the SDC tech forum to find out what to lubricate the regulator with, and found this (kudos to Rockne10 for the info):

When we change the oil and lubricate on a regular schedule, we often neglect the non-drivetrain moving parts. Lubricating door, hood and trunk hinges and latches should be an annual event. Use Door-Ease on striker plates and hood and trunk latches; graphite in window channels and lithium on window regulators and window lift tracks.

Solder Seal makes white lithium grease in a 10-oz. spray can, my preferred method of application. a few spritzes of this in the gears of my salvaged '63 Cruiser regulator, and she's loosened up beautifully - the riser spring is so strong it almost wants to launch into the "up" position without assistance. Can't wait to get it in the door so I can feel like I've actually accomplished something on this car (that does happen sometimes, right?).

Labels:

Tuesday, September 19, 2006

Different By Design.

It's not just a slogan, it's a way of life!

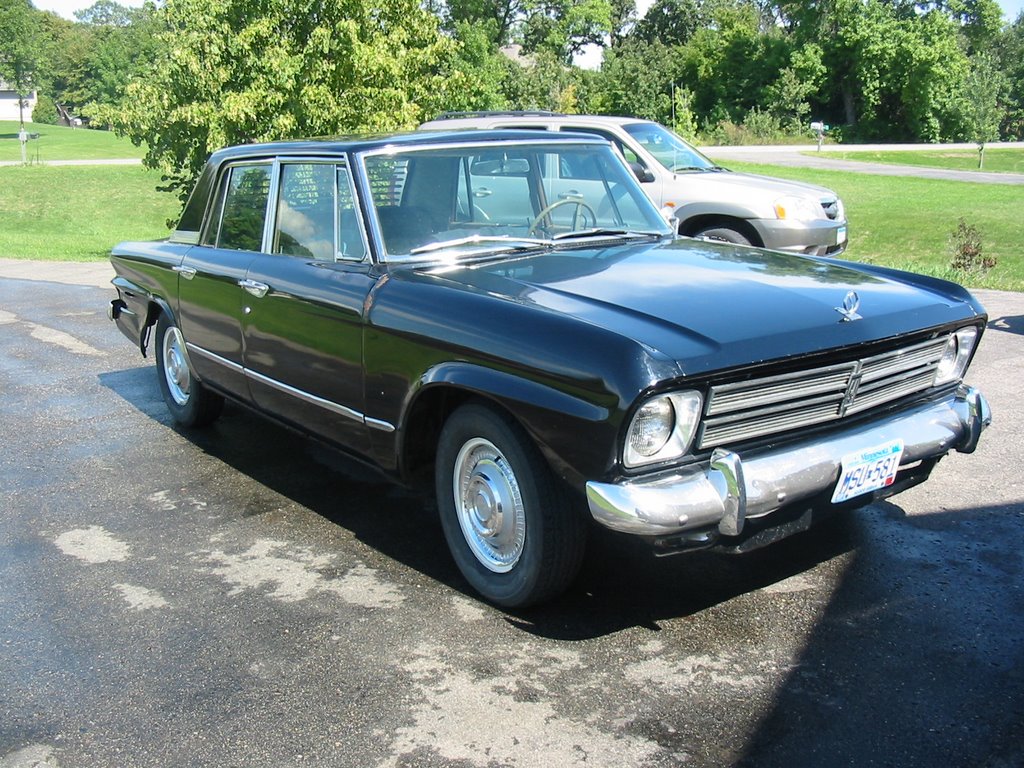
I found a fellow Studeblogger. Scott from Minnesota, owner of a black 66 Cruiser 4-door, posts at Different By Design. He's heavily into the early history of Studebaker, with lots of historical references on the E-M-F, Flanders, and other early marques associated with South Bend. He also has a trove of historical documents posted. Worth a read!

Mystery Carb!

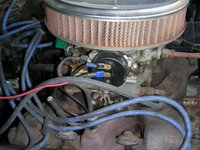
Interesting! I found out from the guys on the Studebaker Drivers Club Forums that the carb on my Lark wasn't original equipment. By extension, neither was the intake. I kind of figured; after all, Carter 4-bbls from this time of the '60s were usually AFBs; the one on my Stude is a WCFB.

Where it gets interesting, though, is that my carb - a 2219S - actually IS from a Studebaker. Thing is, it's a 1957 Studebaker! Probably a President. Seems whoever did this car before swapped in manifold and carb straight outta an older Stude. Ah well... whatever works! The PO also converted the carb to electric choke. Think I'll leave it that way ;^)

Labels: , ,

Saturday, September 16, 2006

The Interior.

I've been in Ohio all week, and Studes have been scarce. In fact, the only car I saw over 5 years old while in Cleveland was an orange '37 Plymouth 4-door that had been mildly rodded and was for sale on someone's lawn :^) But now I'm home and can post the interior pix of my Lark. First, the dash:


You'll probably notice a number of interesting things in this photo. First is the 10" cheapie Grant steering wheel. I hate these things and this one will be disappearing soon; I've already obtained a nearly NOS-condition black wheel from eBay; I'll substitute it after I re-do the wiring harness. Why re-do the wiring harness, you ask? Well, remember the burnt wires in my previous post? Plus, look at that bundle of wires hanging out of the dash just below the ignition switch. It consists of two unidentified reds, one with a bare spade connector, and a thick black that measures 14 volts with key off and is protected by a loop of electrical tape! Urrgh.

You can also see that the ignition lock bezel has, like so many of these cars, gone south. The entire ignition cylinder has been replaced with one that's held to the dash with a big ring nut and washer.

In this shot you can see the weird homebrew dash cover that the PO installed. I'm sure the factory dash pad was cracked, so they used some sort of foam to fill the space where the "glove box" was and fabricated this vinyl cover for the entire dash. It's actually fairly well done. They used one of the "Studebaker" scripts originally located on the front fenders as a dash ornament. Also note the CD player stuffed in the dash. This means a cut dash behind all of this :^(

You can see the open hole where the speedo was. I'll replace it when I do the harness. See that piece of duct-tape-wrapped hose lying on the floor? That's one of the original defroster duct hoses; when their coverings disintegrated, the PO simply wrapped the remaining wire substructure in duct tape and stuck 'em back up there...

Homebrew door panels on both sides. Not a bad job, but I'll be looking for some NOS panels. The cardboard backer is completely water-warped, and instead of using the proper trim clips to hold the panel to the door, they screwed it on with #1 chrome Philips screws and shoulder washers. This actually caused me a little grief: the driver's door could not be locked when I brought the car home; turned out that one of the screws was drilled into the door lock assembly and prevented the lock mech from operating. Sheesh...

The girl's hair bungee is holding the window crank in the "full up" position. The regulator spring has gone south and without this assist, the window shoots straight to the bottom of the door. Some Stude vendors offer rebuilt units, but they're expensive - $185.00 with exchange! - so I found one on eBay which came a couple days ago. I'll post pix of the changeout.


The front seat has been reupholstered using a mix of black vinyl and black short crushed velvet-like material. Not a bad job, actually.


Rear seat and quarter panels have been given the same treatment as the front seat and door panels. Seat belts all around. Note the red fire extinguisher peeking into the pic at bottom - good idea to always carry an extinguisher in any vintage car (especially one with wiring that looks like mine).


Headliner has also been re-done in black vinyl, although I wish it hadn't. It's really awful - not tight. Baggy everywhere, especially in front. To do the headliner properly in these Larks, the front and rear glass must be pulled; whoever did this job either didn't know that or didn't want to know. The visors are toast, but the mirror's good. Windlace around the doors is, naturally, shot; new will be coming from Phantom Auto Works, who I'm told do the best Studebaker interior repro in the business and have bolts of NOS cloth to work with.

So much to do and only 6 years to do it in :^>

Labels: ,

Monday, September 11, 2006

Most Beautiful Stude Ever?

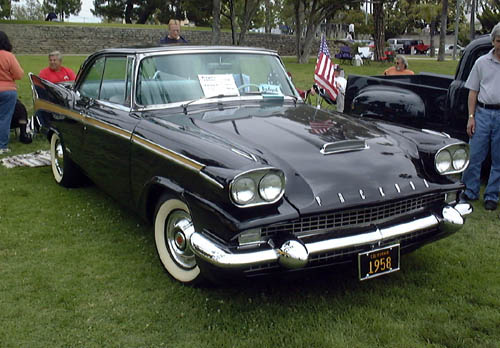
Get a bunch of Studebaker lovers together and ask them which was the prettiest ever, and you'll have as many opinions as you have people. Some might choose the '53 Starlight hardtop, or the '64 Daytona convertible, or the '62 Gran Turismo Hawk, or the beautiful '40 President two-door sedans. But there are a growing contingent who would finger the '58 President Starlight hardtop for the honor.

There's a lot to be said for the '58. In a year of wretched excess in the US automobile industry - a year that gave us the godawful chrome-laden Buick Century, the awful Oldsmobile 88, the aberrent non-sequitur Ford Fairlane and the hideously ugly Rambler Ambassador, the Studebaker President and Champion hardtops were clean, good-looking and positively restrained by comparison.

The '58 hardtop was conceived on the watch of Harold Churchill, the Studebaker prexy who came up with the Lark just a year later. He didn't necessarily want a showy hardtop in the non-Hawk line, but the dealers wanted a car they could use to compete with Big Three offerings. Duncan McRae (who had the unenviable task of attempting to make a 2nd-year design on a 5-year-old body shell look fresh in the facelift-every-year Fifties) designed the hardtop and grafted it onto the two-door sedan body. It was also used at the high end of the final Packard lineup, albeit with Packard cathedral taillights and a weird double-tailfin that kind of ruined the line of the rear end.

But the '58 President Starlight hardtop turned out to be one of the most striking Studes ever to hit the road. Viewed from the front, it has a massive grille that still manages to be tasteful compared to what was coming out of Detroit and Kenosha; from the side it was absolutely breathtaking, with the upkick of the tailfins beginning just below the quarter window, which fed into a svelte c-pillar and a graceful wraparound backglass.

Although they weren't hot sellers when new, these cars are finding a new following - here's a great article on them in the Chicago Sun-Times. Unfortunately, this lovely design was built for one year only, and deep-sixed when Churchill dumped the Presidents and Commanders the following year to mount a last-ditch company-saving effort with the Lark. Someone should start a registry...

Labels:

Pertinent Data.

Thought I'd post all the numbers from my car, so here goes:

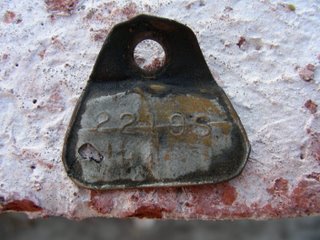
Carb tag: 2219S

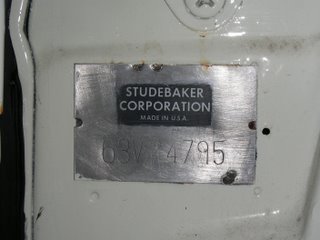
Serial number tag (prehistoric VIN!): 63V-24795

Engine serial number: V58I775

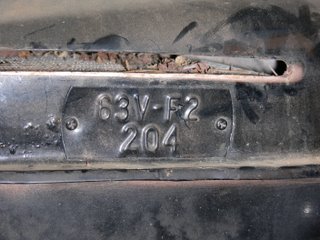
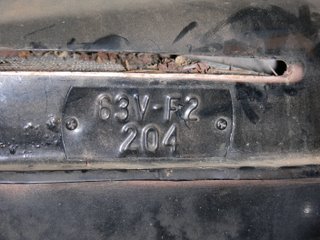
Body tag: 63V-F2 / 204

Labels: ,

Saturday, September 09, 2006

New pics.

It's been several weeks since we brought the Lark home, and I realized that the only pix I had taken were the few cell-phone shots I took on the day we purchased her. So I went out and took some better shots today, both to show you what we're working with and to document the starting point of what I'm confident is going to become a standout little cruiser.

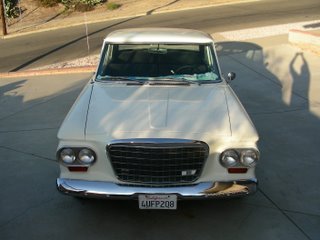
Here's a shot from the front. There are several things that make the Standard unique compared to other Larks; first is the absence of chrome beltline trim that begins as "eyebrows" over the headlights on Larks of all other trim levels. Also notice that there's no hood ornament, which came standard on other Larks. The PO put a couple of emblems on the grille - a Twin Traction ornament transplanted from the trunk lid and a '63 V8 grille emblem. (Standards had no grille emblems at all.) The PO put stainless trim from another Lark around the front window and chromed the vent intake as well; normal Standards had neither.

View from the rear shows the missing trunk keylock (broken tailshaft; a new one's on order), missing Twin Trac ornament (mounting holes on the left) and chrome rings missing from the taillights. Standards had nearly all exterior brightwork deleted; other Larks had "STUDEBAKER" spelled out in individual chrome letters across the face of the trunk lid, along with stainless trunk lip molding that went between the backup lights, and a chromed pot-metal molding at the top of the filler panel. There would also have been a round "V8" or Lark emblem on the top of the lid.

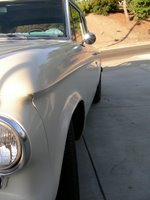
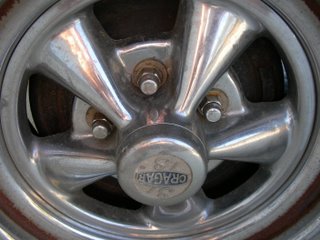
Side profile shows the lack of beltline trim. I really like the look the Cragar S/S wheels give the car. Tires are 225/70-R15 in the rear and 205/60-R15 in front. Most larks had "LARK" spelled out at the edge of the front fenders; Standards had the '50's vintage "Studebaker" script that also adorned the trunk filler panel of the Avanti in '63. The PO removed these scripts and filled the mounting holes.

Three-quarter view looks pretty good! Bricks are under the rear tires because the parking brake is non-op. Busted cable somewhere - I think it's the front, since the rear cable seems to be intact. Car is too low for me to shimmy under and see for sure and I haven't felt like digging out the chocks and jackstands yet ;)

As you can see from the side view, the sheet metal is very straight. Looks this way on the other side, too. I have discovered a tiny bit of rust in the front edges of the doors, bubbling under the paint. Doors and the rear edges of the front fenders are notorious rust spots in these cars; my fenders are in excellent shape (I've looked inside them from behind). I also checked the inner door skins when I had the door panels off; not much water damage in there, so I can only assume the door rust is surface stuff that started during the paint process - can't see it at all from inside the door. Fender lips are also in great shape, as is the area over the headlights. There are no inner fenders in a Studebaker - there's nothing behind that sheetmetal!

Wheel weirdness: what's up with those washers? Couldn't afford proper tapered lug nuts? So we've got flat lug nuts with 3/16" flat washers behind them. I don't even want to know what those nuts are torqued to.

Engine bay: Looks pretty unmolested in here (except for a few obvious mods). Dunno why the valve covers are painted black - they should be yellow. Pancake air cleaner has replaced Stude dry-filter model. The radiator is original (at least the tanks are!) but the "fan guard" (actually just a piece of 1" angle with a label that said "CAUTION - FAN" mounted to the top rad tank) is gone, and the fan itself has been replaced with a much larger 4-blade... probably why the fan guard is gone; it wouldn't have cleared the fan. Original Prestolite alternator is present! Engine serial number is V581775, which would be late -'63 production.

PO made a few operational mods, including converting the carb from its original Carter AFB to a WCFB and from manifold-heated choke to electric. You can see the heat riser tube capped with a piece of rubber tube and a screw...! Carb tag reads "2219S" which The Carburetor Doctor identifies as correct for a Stude but from a much earlier car - a '55 - '58 Champion, President or Scotsman, and maybe for '59 - '60 Larks. According to the manual, this should be a Carter AFB, 3540S. More investigation required here.

PO also upgraded the Prestolite distributor from points to the Pertronix Ignitor breakerless setup.

What have we here? This is just one reason I've got a new wiring harness ordered from Studebaker West. See the melted plastic wrap? See the bare stranded wire with the insulation melted off? I believe this is the remains of the horn relay circuit. I'm told that this circuit is a common one to fry - it's lucky this car didn't burn to the ground. The horn is currently wired with a length of brown Zip cord... gawd. Orange wire hanging there should go to the engine temperature sender on the back of the left head, but is... well, hanging there.

Cowl data tag tells the tale: "63V" = 1963 model with 259 V-8; "F2" = Lark Standard. "204" is trim code; I have to decipher that yet. Should tell me what color the car was originally.

By the way, see that slot above the cowl tag? Look closely - that's the heater core you see in there. Along with lots of evidence of population rodentia. I vacuumed about a quart of tree leaves, plant matter and other nest material out of there; there's more to go but I'm going to have to drop the core to get to it all. By the way, that slot? It's for the cabin air filter. That's right - Studebaker had one in 1963! In fact, I believe they started filtering the heater air supply in Larks beginning in 1960 or so. So all the carmakers these days who use "cabin air filter" as a selling point can bite me - Studebaker did it first 50 years ago!

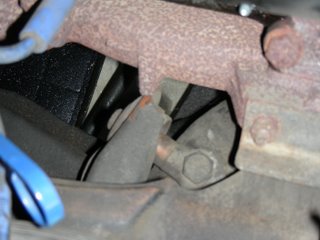
This scared hell out of me when I first saw it. Yes, that's the right exhaust manifold resting against the right rear upper A-arm mounting. I couldn't figure out what the hell could cause this to happen, and then it occurred to me...

...yup, a collapsed motor mount. Sheared right in half, it looks like. Scary. But I'll be pulling the motor soon (that's a whole 'nother story) so all the mounts will get replaced.

Trunk looks pretty darn good. No rust anywhere. No spare or jack either! Luckily, SASCO has NOS jacks in stock. That's on my list of things to get as soon as there's some "extra" cash (yeah, right!)

Yeah, there really is a Twin-Traction rear end under there! All the tags are intact. It's a 3.31 gear. Good compromise between economy and go.

When my neighbor Bruce had the car on his rack, it was obvious the rear springs were shot. If you look at the forward spring eye, you can see that the main leaf actually curves UP before the spring clip. These'll have to be rebuilt or replaced. I'm going to try E&C Spring in Escondido first; I used them 4 years ago to re-arch the springs on my '87 Grand Wagoneer and they did a first-rate job. If they can't help, Eaton Detroit still makes 'em, but they seem to think they're forging 'em out of gold or something - $429 a pair!

That's all for now. Next post will have interior pix!

Labels: ,

It's here!

I've been eBaying for partz for the Lark (my wife has named it Barney, because of the vintage dealer plate frame that proclaims "Barney's Lark/Hawk, Escondido CA") and I found a good used driver's side window regulator for $55 from a seller in, of all places, Detroit. This is a good price, because these parts are long out of production, and rebuilt units go for $185 from the Stude parts houses.

What happens is that the tension spring on these regulators breaks, making it impossible to keep the window in any position but full down. Trying to roll it up will result in a "whoosh/thump!" as the window immediately rushes to the bottom of the track and smacks the stop. On ours, the PO rigged one of his daughter's hair bungees to bind the window crank to the door latch handle, keeping it in the "up" position - ingenious, no?

So I found one on eBay, bid on it and... watched it get sniped. I vowed that the next one would be mine, and it is - and for less than that first one went for, too! Looking forward to getting this put in. I'll post pix of the process.

Tuesday, September 05, 2006

Wired together.

Messing with an old car inevitably leads one to a need for a good wiring diagram. While reprints of factory service and parts manuals are easily and affordably available for my Lark (and many other Studes), I found that the wiring diagram in the manual left a bit to be desired. The diagram (often with callouts hand-lettered) is on a page by itself, while the color chart is on a separate page along with fuse ratings etc. I thought this was a tad inconvenient and went about finding another source.

The folks at Studebakerparts.com have graciously posted an entire gallery worth of wiring diagrams, for everything from the 1936 model year right up to the end in 1966, and I found the one posted for my Lark better than the factory diagram. Not only that, they're JPEGs and easily printable, so you're not lugging an 800-page book with you into the garage ;)

Speaking of manuals, if you're a fan of classic cars (which I assume you are if you're reading this blog!) check out The Old Car Manual Project. Not only do they have an archive of owner's manuals and even some repair manuals, they have a huge selection of vintage showroom brochures for domestic and foreign cars; everything from AMC to Zil. And they're always looking for additions; got some old brochures? Scan 'em and send 'em in.

Labels:

Friday, September 01, 2006

Bulletnose!

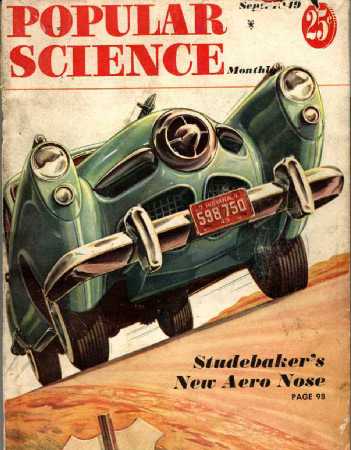
There's just something about a '50-'51 Stude. Even though the aircraft-inspired "bullet nose" Studebaker styling was only in production for two years, it was so wild, so futuristic, that it made an idelible mark on the American conciousness.

I stumbled across the website of a 1950 Champion owner who's assembled a heck of a tribute to the '50s, with an extensive collection of scanned magazine articles and road tests (including one from Tom McCahill), magazine advertising, owner's manual and more. Check it out here.

For a whole 'nother take on the Bulletnose experience, you've gotta see this project on Hotrodders.com that details the transformation of another '50 Champion two-door into an incredible street rod. Chopped, channeled, sectioned, blown, and screaming purple... what a ride!

Labels: