The Studeblogger

Thursday, April 29, 2010

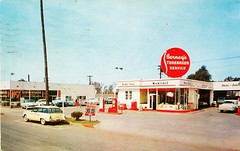
Barney's Motor Service, CA, 1957, Studebaker-Packard, Escondido

Finally - I get to see one of Barney's dealership homes, Barney's Studebaker service in Escondido, California. This color photo from 1957 was posted by Alden Jewel over on Flickr, and it's the first pic I've ever seen of the location.

Barney wasn't sold here (he was originally delivered to Bob Waters Studebaker in San Francisco, now the site of a Toyota dealer), but the fact that he wears those plate frames means he was probably either serviced there or, more likely, traded in by whomever brought him down South.

It's great to finally have a view of this dealer!

Labels: ,

Tuesday, April 27, 2010

Check your doors!

Ever have a car door swing shut on your shin? Foot? Hand? You thought you had it held open by the door check (that friction device that keeps the door from swinging shut while you're fiddling with something inside), but the check was broken and didn't work right. If you've got an old car, chances are it's happened to you. With GM cars, it's usually a broken or missing spring in the hinge assembly itself, but with Studebakers, the door check is a separate piece that's easy to change out in about 10 minutes.

Here's a Studebaker door check. It's a steel strap that is held to the door hinge pillar with a soft metal pin. The way it works is that two spring-steel "fingers" on the top and bottom of the strap pinch the center bar, preventing the door from slipping closed on its own when it's fully opened.

On Barney, however, the driver's side check was broken: the lower "finger" had long ago broken off, exerting no friction on the strap, which let the door slam my shin (and forearm, and head) many times as I worked inside the car. This part is not reproduced, but is used on many years of Studes from the Fifties through 1966. Finally, I found a good used check assembly for sale on eBay and proceeded to fix the problem.

Besides the new door check, you'll also need one small part from Studebaker International: the soft metal pin that holds the check to the hinge pillar. This is Studebaker part number 1327195, and will cost you a big $2.00. One is all you'll need.

Start by pulling the interior door panel off. To do this you'll need to remove the arm rest (if equipped), and the window and door lock handles. (See my prior post here for more on removing the door panel, if needed.) Once the panel is off, you'll be able to look into the door and easily see the back end of the door check, with its rubber bumper.

To remove the old door check, you must drive out the old door check pin. The factory secured these pins by flaring them at the bottom, so grab the bottom of the pin with a pair of pliers and squeeze the soft metal inward. Rotate the pin and do this several times, until you can push the pin upward with your fingers.

Then, use a drift to drive the pin the rest of the way up through the check assembly. A couple of raps with a small hammer should do the trick. Once the pin is out, the check assembly can simply be pulled out through the interior of the door.

Installing the new check is even simpler than getting the old one out. You just feed the check strap through the slot in the door that the old one came out of. Mate the check with the hardware mounted in the hinge pillar, and slide the new check pin downward through the assembly. Hold it in with a pair of pliers and flare the bottom of the pin using a Philips screwdriver or some other appropriate tool.

You're done! The new check is in and ready to stand sentinel against unfettered door closure. Finally, after three years, my driver's door opens and secures with a satisfying "snick." The only thing left to do is shoot the check strap with a bit of lithium grease and put a drop of oil on the pin.

I wish they were all this easy!

Labels: ,

Saturday, April 03, 2010

Reinventing the wheel - Part 1.

Since the day I bought Barney, one thing that's really bothered me was the Stupid Grant Steering Wheelâ„¢ installed by the former owner. OK, it looks '60s cool, but has several drawbacks:
  1. It doesn't cancel the turn signals.
  2. The horn button doesn't work.
  3. The spokes obscure the speedometer.
  4. My car has standard steering, so the small diameter of the wheel makes parking and other low-speed maneuvers a real chore.
So I decided early on to get the parts together for an OEM steering wheel, and spent about 2 years gathering them all; including an all-black wheel from a '62 GT Hawk, a proper horn button, and all the switches, wipers and contacts that make up the rotating electrical assembly for the horn button.

Last Sunday, I decided, was the day. I'd read up on how to run wires down the column jacket (via Bob Johnstone's tech archive), so was well-prepared, I thought, to get the job done quickly.

I pulled the wheel off the Grant adapter and easily removed the adapter from the column using a 3-jaw gear puller. No problem! The PO had nipped the horn wire off the old switch and crimped on a lead to go to the Grant horn button. This had failed, which was why there was no horn action; he'd also removed the original spring-loaded switch contact. No problem; I had a new one, so I used the old wire to feed a pilot wire up the column per Bob's explanation. That's where my problems began.

The wire channel through the column jacket exits the column just under the shifter collar; the wires must then make a 50-degree turn to get into the hub. No matter how I tried, the bullet connector molded onto the end of the old wire would not make that turn. I see-sawed the wires back and forth and pulled mightily... a little too mightily, as the pilot wire released itself from the old horn wire, leaving me with the wire pulled nearly all the way out, yet stuck - with no way to feed it back down. Arrgh.

I unbent a coat hanger and was able to get it through the channel just fine, so though perhaps I could snag the offending wire and pull it back down... no dice. All told, I managed to spend nearly 3 fruitless hours on the project, winding up reinstalling the Grant wheel so I could drive the car and putting off the project for another day.

What's going to have to happen is this: In order to free the old horn wire and feed in the new, I will need to remove the shifter jacket. Problem with this is, the jacket is held onto the column by two "T-nuts" whose heads are inside the column. They will be very hard to get re-installed... but it's either that, or live with this awful wheel and no horn or turn signal canceling forever. I guess while I'm doing it, I'll install a new turn signal switch as well just to make sure there are no problems down the road.

In the meantime: Happy Easter, everyone, and happy Studebakering!

Labels: ,