Fully regulated.
Well, I feel pretty good today because my son and I changed out the old, broken window regulator in the driver's door with a "new" used regulator procured from eBay. (This is one of the things that my wife wanted fixed immediately, and now I can check it off! It was also a major annoyance.)
Window regulators are one of those items which are no longer produced for these cars, and the cost of rebuilding one is a little steep: $175 is the going rate from Studebaker International (and that after a refundable core charge for your old regulator). Luckily, I got mine off eBay for $55. The thing that usually goes wrong with these regulators is that the heavy spiral spring that pushes the regulator UP eventually breaks, and the window shoots to the bottom of its channel. There are other things that can happen to them, but that's the most common.
Since we bought the car, the driver's window has been held up with a mini-bungee cord between the window crank and the door latch release. Definitely an annoyance.
First thing we had to do was to remove the door trim panel. To do this, you have to first remove the handles; Studebaker uses the GM-style U-clips in the handles that snap into a channel machined into the splined crank shafts. This requires a special regulator clip removal tool that can be found at any good automotive paint store or NAPA. You just run it between the handle and the door and presto! the retaining clip is pushed back and the handle releases. Once the trim panel is off, you have to lower the window (not a problem in this case!) and disengage the two nylon rollers that run in the window lift channel from the posts on the regulator. You can access the lift channel in the large access hole at the bottom of the door when the window is at its lowest position. Unfortunately, you can't see the rollers in the picture here, but they are held to their posts with more little wire U-clips; a set of long-nose pliers is a handy tool to have here. I found that only one of the rollers was still intact and clipped to its post; the other had self-destructed and its remnants were clinging to the post as best they could.
Once the rollers are free from the regulator, you must lift the window to the top of the door and secure it in the "up" position. A couple or three strips of duct tape around the top of the door frame did the trick for us. The forward glass run channel that the window rides in is secured on top of the regulator's mounting position, so it has to be loosened and gently pushed forward (toward the door's outer skin) in order for the regulator's crank shaft to come inward and clear its hole. If you follow the vent window divider down the door, you'll find two big bolts with lock washers (the old-fashioned kind with four teeth) on a diagonal plane above and below the regulator and its four mounting bolts. Remove them both.
You can now remove the four regulator mounting bolts. The regulator will be free in the door, but will stay where it is because it's held in place by the glass run channel. You'll need to reach through the access hole and gently push the run channel outward, freeing the regulator's crank shaft. You can now let the regulator rest in the bottom of the door.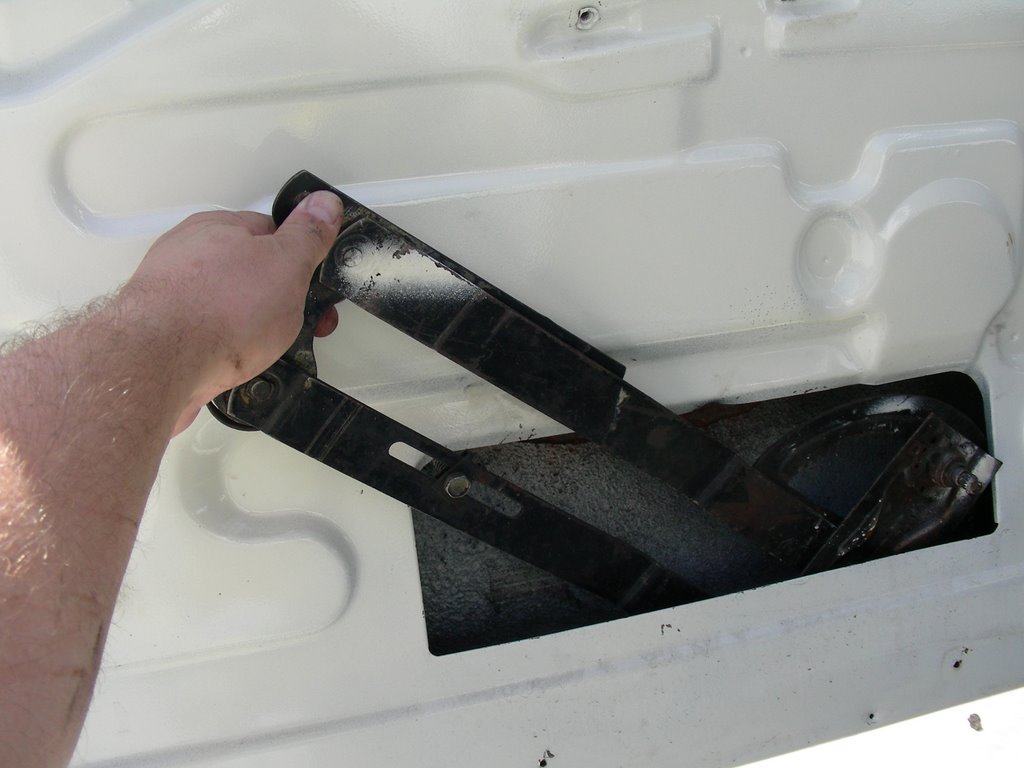 With the regulator in the "down" position (you left it down after disconnecting the nylon rollers, right?) it's pretty much a long rectangular shape. Grab hold of the end with the spring (the end away from the crank) and tilt it up through the access hole. A little wiggling and the large sector gear and crank assembly will clear the hole and out she comes.
Now you've come to the point in the project where you get to take a break, crack a beer and marvel at the stupidity of the car's previous owner! Laugh at the way he mutilated the inner door panel for no discernable reason. Check out the homebrew regulator repair and marvel that the thing worked even as well as it did! Here's a "before and after" shot, of a sort. On top, you can see the "new" regulator, all lubed with white lithium grease and ready to go. Notice the new orange nylon roller test-fitted to the riser arm.
On the bottom, check out the old regulator as it came out of the door. Notice anything different? It's the same part, from the same year car, but something's strange... what could it be?
Well, two things are apparent, actually. First, notice the big, globby welds around the sector gear assembly. Apparently, the crank shaft bearing had broken loose from its mounting plate sometime in the past 43 years, and the PO attempted to weld it back together. Well, I guess I could be more charitable: they did weld it back together. But it sure ain't pretty. Those big globs of weld are on both sides of the assembly. Crude, but effective, I guess. Sure ugly as sin, though.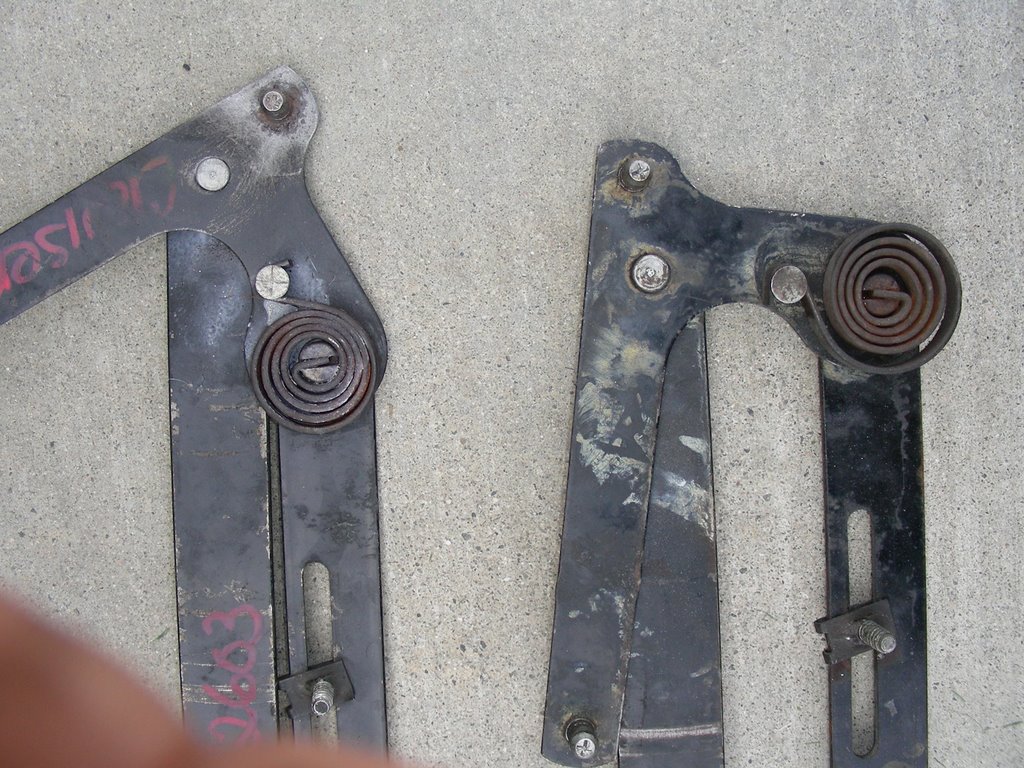 But that's not the big thing. Look at the springs. Notice the direction in which the one on the old regulator (on the right) is installed. Now notice the direction of the spring on the new part (on the left). That's right! The spring on the old part is installed backward!
Yes, when the PO took this regulator apart for service, he installed the lift spring in the wrong direction! And because the direction of the spring was reversed, it was actually pushing the window down instead of up!
I suppose, if I'd pulled the part and looked at it before I bought a replacement, I might have sussed this out and saved the cash, but having nothing with which to compare it, maybe I wouldn't have. In any case, the replacement regulator is in much better shape than the old one, so I consider it money well spent. And now I have a spare I can rebuild if need be. Okay, now that you've finished laughing, it's time to put the new part back in the door. Installation, as the story goes, is pretty much the same as removal.
You will most likely have to replace the old regulator seal, which was made of a foam-type rubber and most likely is now the consistency of sand, if it's even left intact. Clean the area around the regulator crank shaft and slip one of these on the shaft. (I found that Stude Int'l doesn't carry this part, but that SASCO does; its original part number was 310844, but the new number is 770097; you can poke in either in SASCO's online database. They cost a buck each; order twice as many as you think you'll need because the regulator spacer that goes on the shaft between the handle escutcheon and the door panel is no longer available; this part however will slot right in.
There are two little felt anti-rattle washers that go on the regulator posts before the nylon rollers attach to them; these are part number 1355098 and are also available from SASCO for a buck each. The "new" regulator I bought had two of these between the roller and the regulator, but the shop manual only shows one and that's how I went. Slot these on the posts and put the new regulator into the door, tilting it through the large access hole the way the old one came out. Then put your arm through the small access hole and push the glass run channel forward again; maneuver the regulator crank shaft into its hole and release the run channel. Put the run channel bolts in but do not tighten them yet.
Reinstall the four regulator bolts and tighten them down.
The reason you didn't tighten the glass run channel bolts is that there's a good chance, with all of that shoving of the channel, that the forward edge of the door glass is no longer within the channel. Put the window crank back on the regulator shaft and lower the regulator all the way down. Now you can peel the duct tape from the window and gently lower it into the door, where the lift channel will rest against the regulator lift posts. Look down into the top of the door and make sure the glass is inside the run channel. When you're sure it's seated properly, tighten the two glass run channel bolts.
Now, you can install a new set of nylon rollers. These come as a set with their U-clips from Studebaker International. First, slide the old ones out of the run channel; marvel at how crusty and deformed they are and look at the old honey-colored grease globs that cling tightly to them. Make sure the clips are fully engaged on the new rollers, then slide one in each end of the lift channel. Push the lift channel outward a little and engage the rollers on the regulator riser shafts; pull the glass firmly toward the regulator and the clips will engage the shafts with a delicate little click.At this point, you may need to adjust the regulator to make sure the window glass is level. See that bolt showing through the hole in the door about 5" below the regulator crank shaft? That's the adjusting bolt. If the window glass is tilted in the frame, loosen this bolt slightly and, using a flat-bladed screwdriver, push the bolt gently to level the glass. Pushing the adjuster toward the rear of the door will raise the trailing edge of the glass; pushing it toward the front of the door will lower the trailing edge. Level it by eyeball and then tighten the adjuster back up (don't overtorque it or else the window will bind.)
Now you can test your new regulator and be really pleased that the window once again stays in any position you put it in! Woot!
This is a good time to clean out any crud that might be inside the door. Usually there's a small pile of junk in the door bottom; clean out anything you find and make sure that the two door drains (front and rear) are open; clogged drains will lead to doorskin rust pretty quickly. Also, chances are that the plastic tape that originally sealed the access holes in the door is long gone; get some 5-mil plastic sheeting ($5 a roll at Wal-Mart) and cut some pieces to fit the holes. Use 3M Weatherstrip Adhesive or Strip-Calk (my favorite!) to adhere the plastic to the door and put the door panel back on.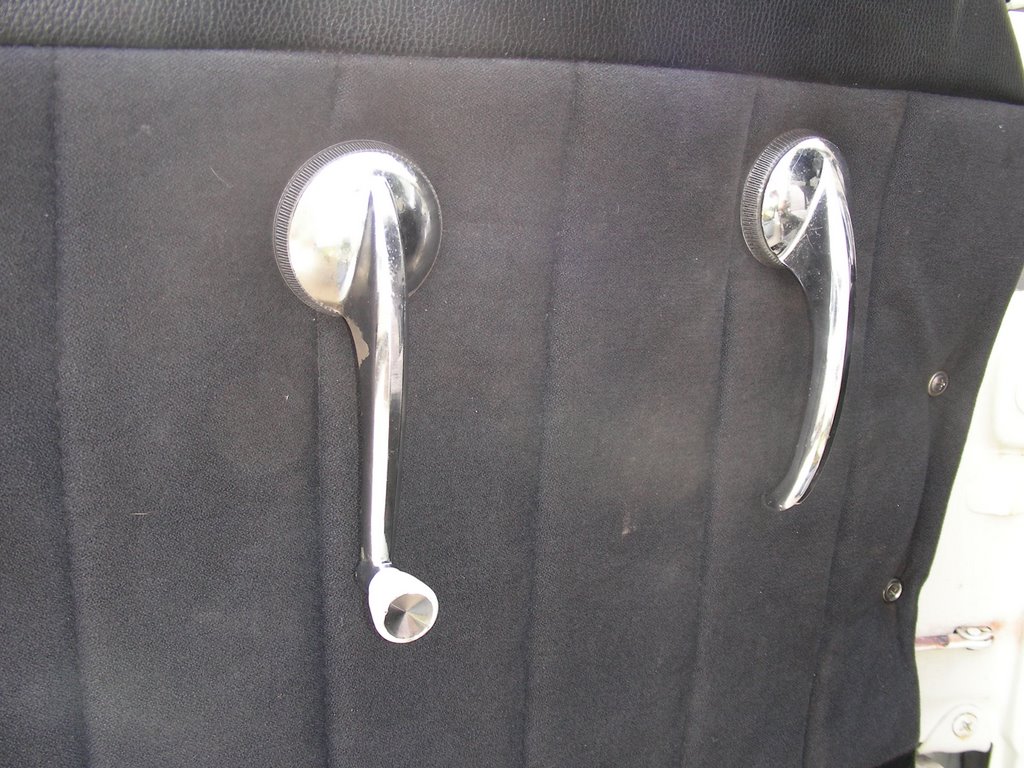 Now you can reinstall the window crank and latch handle. Our car was missing the trim escutcheons that are supposed to go between the handles and door panels, so I got a repro set from studebakerparts.com , part number 1333574. The regulator spacer I mentioned above (that's no longer available) is supposed to fit between these and the door panel, but as I mentioned, the regulator seal #310844 fits perfectly. Put one set of these on the regulator crank and the other set on the latch shaft. Reset the clips on the cranks and snap the latch handle back on; there's one more part needed before you reinstall the window crank: a slick plastic separator that keeps the crank from biting into and destroying the escutcheon as it rotates. The parts manual shows a part number of 1334393, but it's been superseded by 1312647, which is available from all three suppliers. Put this on top of the escutcheon and snap the crank handle onto the shaft.
Now's a good time to lubricate the window run channels, while we're at it. Lower the window, take some graphite spray and apply it to the front and rear glass run channels. Crank the window up and down a few time to distribute the lube.
Voila! You're done. Stand back and enjoy the fact that your windows now operate properly, and that you don't need that bungee to keep the window up anymore, then go wash all the old grease and other assorted crap from your hands. Revel in a job well done.
posted by Clark at
9:35 PM
![]()
![]()

0 Comments:
Post a Comment
<< Home