For a while now, the smell of gasoline has been pretty strong inside the car, and even stronger in the trunk, after sitting for a little while. I suspected that the problem was in the area of the fuel filler, since the smell was strongest there. In '63 Larks, Studebaker used a rubber hose to link the fuel tank inlet neck and the filler pipe.

The hose on my car was pretty soft, way more than I thought it should be. And every time I bent down to sniff, the gas was strong there. Studebaker International has all the hoses and gaskets needed to renew this connection, so I sent off for everything and a couple of days later came the little box that meant I had bits to install.
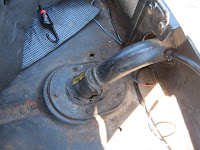
The first thing to do when you're working on anything in the vicinity of the gas tank is, of course, to disconnect the battery to avoid any unplanned combustion. Having done that, the first step is to remove the collar that screws to the trunk floor. Hey look - Rose Mist paint! That's Barney's original color. I don't know if he'll ever return to that color! But it is interesting to look at. The other interesting thing here is the obvious Merdework of a PO - see the expanded foam around the gasket?
At this point I realized that I would have to remove the filler neck from the car in order to get the rubber hose out of its location, as it was holding on to the two steel pipes like a Chinese finger trap. The pipe is easy to remove, being held in by four hex-head sheet-metal screws on the trunk filler panel. After these came out, the filler could be pushed inward a bit and, once the tower clamps on the hose were released, rotated free of its rubber receptacle.
There is also a vent tube that attaches to the extreme end of the filler neck. A short length of rubber hose connects to a loop of fuel line which exits the trunk through the floor. This allows for expansion of the gas in the tank on hot days. You can see the nipple exiting the filler pipe in the photo at left. The rubber hose that led off this nipple was original, and in fact it was held on by the factory spring clamps - another potential source of vapor leaks.
The hose freed, I could see part of the problem. It bore a NAPA legend, but it was not fuel-grade hose - it was thin, flexible and made of multiple layers of corded rubber material - almost like the construction of an old bias-ply tire. I don't know what this stuff was, but it surely was not appropriate for the job it had been doing.
In fact, upon close inspection, I could see that the old hose was permeated with several small but significant cracks, like this 1/4" example. In this photo you can see the fabric construction of the hose, too. Between being the wrong product for the use it was put to and the cracks that had developed in the material, it was pretty obvious that this was a significant source of the fuel vapor we'd been smelling.

I slid on the new rubber hose to keep any dirt from falling into the neck of the fuel tank, and spent a few minutes cleaning up the sealing collar. The PO had tried to seal the torn original factory rubber sheet gasket by shoving weatherstripping foam in the cracks and covering it all with what appeared to be roofing tar or tar-based caulk, probably straight out of the Henry's can. It took a while to clean off.
 |
| Nice rubber, eh? |
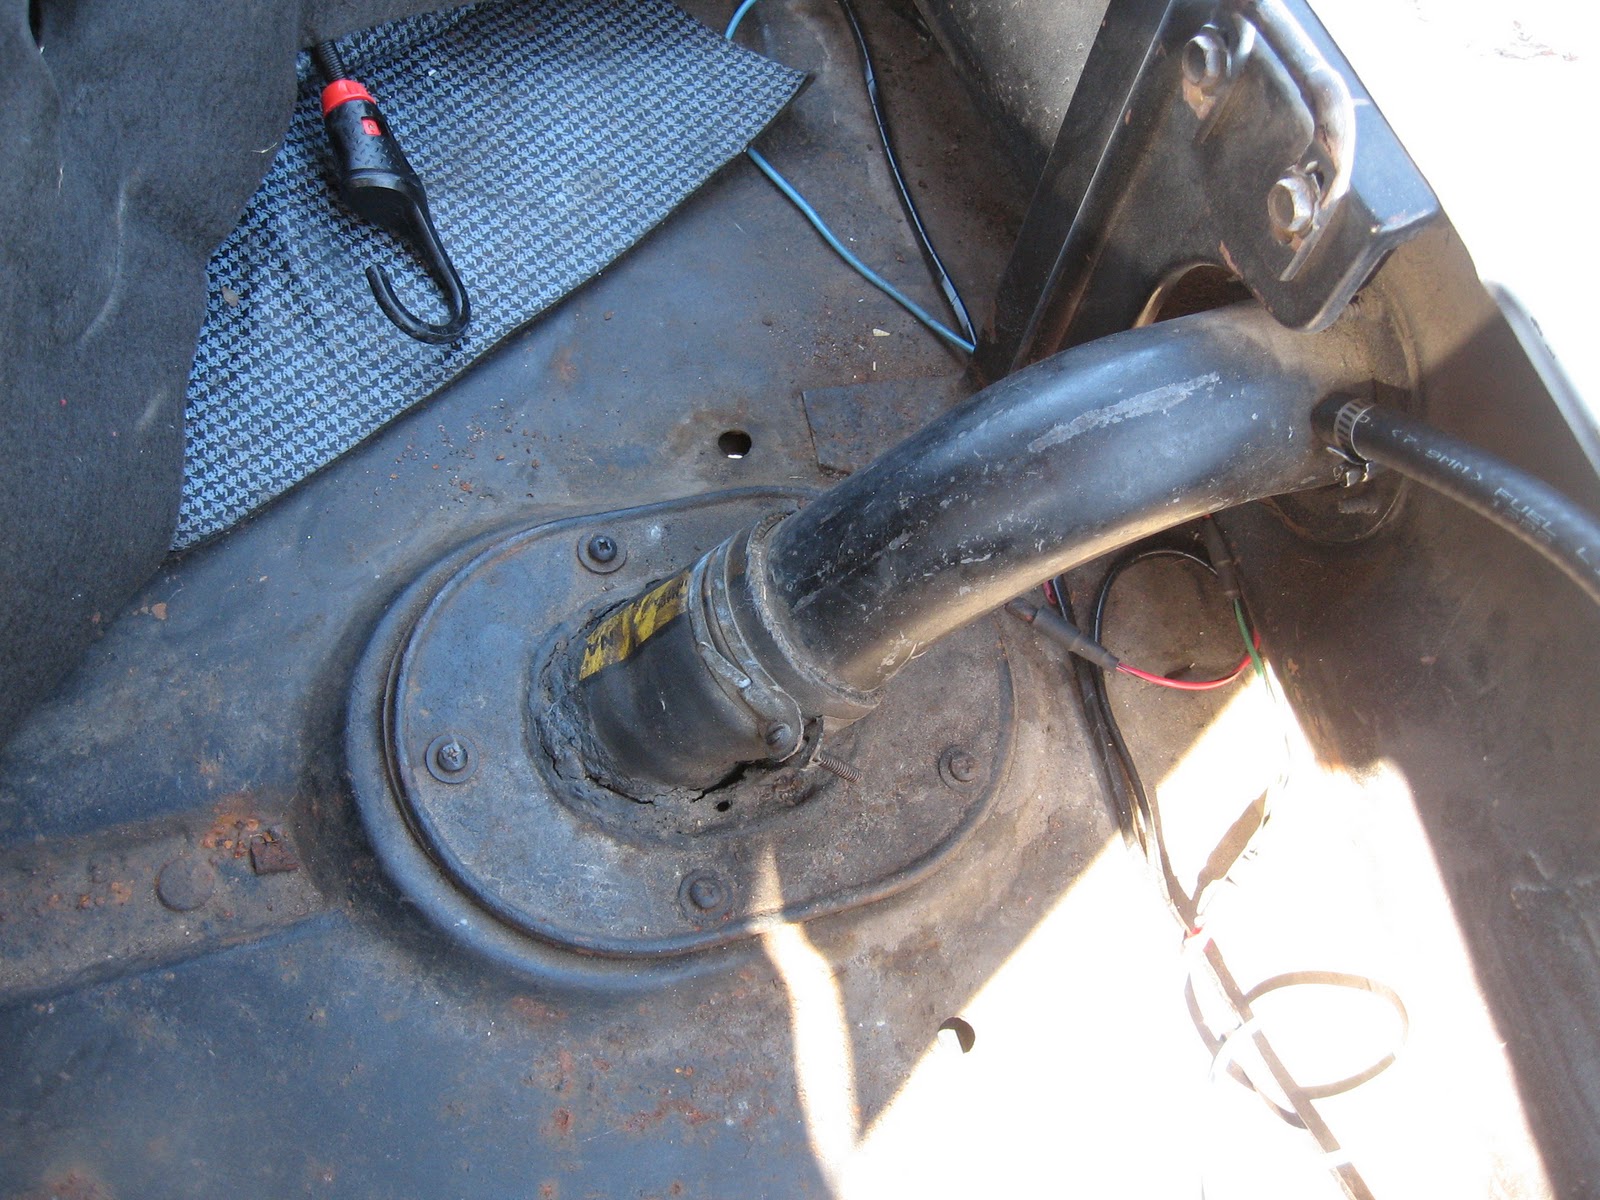
After tightening up the lower tower clamp, I slid the new foam-rubber gasket around the hose and neck. The lead to the gas gauge sender enters the trunk through this point as well, so I had to take care to thread the wire between the hose and the gasket and make sure it didn't contact any metal edges it could vibrate against. Then it was time to put the filler neck back in; I had ordered a new rubber seal for this from SI. The old one peeled off like an F-18, and with the new one slipped on, I slid the neck into the new rubber filler hose (remembering to put the tower clamp and hold-down ring around it before doing so) and screwed it back to the car's filler panel.
From there, it was just a matter of tightening down both tower clamps, adjusting the new floor gasket so its holes lined up with the screw holes in the trunk floor, and then screwing the collar back down to the floor. Done!
Well, almost :) There's that vent hose to install. I deep-sixed the factory spring clamps and found a couple 1/2" towers in my toolbox, along with a length of fuel injection hose. 60 seconds later, the last bit of the puzzle is in place.
 |
| Ahhh... much better. |
Oh, and don't forget to reconnect the fuel sender wire!
Although I had also obtained a new cork gasket for the fuel level sender, intending to re-seal that as well, since it could also have been a potential place for vapor leaks. But, applying my Durante-quality schnozz to the area, I found no trace of odor. And besides, I had no wish to disturb a good seal, although the gas gauge has a tendency to read empty with half a tank left, so I may need to tackle it one day. But that day was not today ;)
The real test, of course, is whether this repair and renew takes care of the fuel smell in the cabin. Leaving the car locked up over night, I waited until about 10AM, after the sun had ample opportunity to warm the tank, and opened up the door... success! There was a faint odor, but that was obviously just the remnants of months worth of gas vapor permeating the upholstery. Opening the trunk, I found no smell of gas at all. One more project checked off the list!
Labels: My Lark, Repair
 For a while now, the smell of gasoline has been pretty strong inside the car, and even stronger in the trunk, after sitting for a little while. I suspected that the problem was in the area of the fuel filler, since the smell was strongest there. In '63 Larks, Studebaker used a rubber hose to link the fuel tank inlet neck and the filler pipe.
 The hose on my car was pretty soft, way more than I thought it should be. And every time I bent down to sniff, the gas was strong there. Studebaker International has all the hoses and gaskets needed to renew this connection, so I sent off for everything and a couple of days later came the little box that meant I had bits to install.


 I slid on the new rubber hose to keep any dirt from falling into the neck of the fuel tank, and spent a few minutes cleaning up the sealing collar. The PO had tried to seal the torn original factory rubber sheet gasket by shoving weatherstripping foam in the cracks and covering it all with what appeared to be roofing tar or tar-based caulk, probably straight out of the Henry's can. It took a while to clean off.


0 Comments:
Post a Comment
<< Home