The Studeblogger

Friday, September 28, 2012

The Scotsman Rides Again.

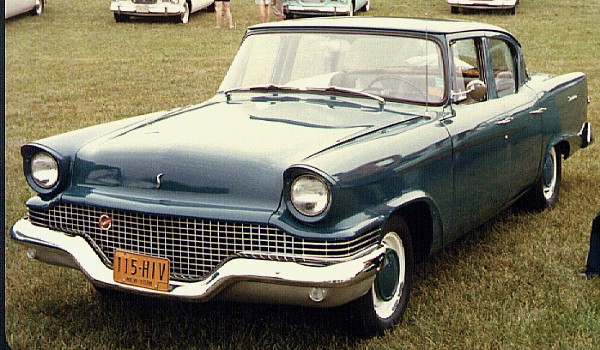
I was browsing Paul Niedermeyer's Curbside Classic site when I found a very well-written article on the Studebaker Scotsman, the low-priced base-price stripper that S-P fielded in 1957-1958 to try to gain a foothold with fleet sales and accounting firms. The Scotsman was the direct ancestor of my Standard, which was a return to familiar territory for the Corporation - take a regular offering and de-content it to meet a price point.


The Scotsman was beautiful in its own way - a big car devoid of chrome, ornamentation or fancy paint jobs in a go-go Atomo-Powered era that was all about glitz and flamboyance. Without the distractions, the smoothness and beauty of the car's lines were easily apparent. And the ploy worked, as Jeff Nelson describes in his article - enough Scotsman cars and trucks were sold to enable the Corporation to field the Lark for 1959, an even bigger success that would give the company another half-decade of life.

Read the article here.

Labels:

Monday, August 13, 2012

Where can I find Studebaker parts?

Yeah, it's true - there hasn't been a Studebaker made since 1966. So it must be impossible to find parts, right? Wrong!

Check out this video taken at the recent (August, 2012) Studebaker Drivers Club International Meet in South Bend, Indiana. You'll see thousands of parts, mechanical, body and trim, plus interviews with parts vendors and reproducers who can find or make nearly anything for a postwar Stude.


If you're looking for Studebaker parts, as the video says,  your best bet is to join the Studebaker Drivers Club and avail yourself of all the resources available there. But if you're not the joining type, that's OK too - check out StudebakerVendors.com for a big listing of who and what.

Keep those Studes running!

Labels: , ,

Sunday, September 25, 2011

I got to drive a Hawk!

Last month at the Vista Village Rod Run, I found a '62 Gran Turismo Hawk for sale. I took a couple of shots, got the seller's name and number, and posted it on the SDC Forum

Last week, Joe from Kentucky sent me a PM. Seems he'd been talking with the seller and was interested in the car; would I go get more pictures and drive the car and report back? Hmm. Let's see... go take pictures of a beautiful Studebaker and get to drive it? Nahh.... Of course I'll go!


The battery was dead, as the owner hadn't driven it since the Rod Run. He inherited the car from his uncle, and it really isn't his thing, which is why he's selling the car. We jumped it from his Crown Vic, and after a few moments of throat clearing and warming up, we toodled off down the road.


The car has been re-engined with a Chevy small-block, and it's a pretty clean installation. No firewall hacks, no frame modifications - they even connected up the power steering.

The owner lived in an area of town with some pretty twisty roads. We joke that someone dumped spaghetti on a map and drew the streets in that area of town! The Hawk took the roads really nicely, although it was a little nose-heavy (as these cars are known to be). The owner said that the front end had been rebuilt and brakes gone through, and even though the brakes were not powered, the car stopped smoothly and quickly.

The car had a full gauge package, and everything worked - oil, amps, temp, gas, tach, clock. The Studebaker Delco radio in the dash was the finishing touch. Very straight body all around, too.


Not everything was roses, of course. The car was built in South Bend but came out of Canada, so there was some rust in the trunk and rockers, but not as much as you'd figure a Canadian car might have, and the frame was very sound. And the power steering was over-boosted and the steering gear needed adjustment; the net effect was that wheels continued turning after you'd quit turning the steering wheel! That took a little getting used to.

I can see why people love these cars. If you have the opportunity to drive (or acquire) one, do so! I'd really enjoy owning one myself, some day.

Labels: , ,

Sunday, January 02, 2011

Head Bolt Torque, Revisited.

A while back I posted about checking and re-torquing head bolts on Studebaker V-8 engines. The Shop Manual contains all the torque specifications and the bolt tightening sequence (which I documented in my earlier post), but recently a thread on the Studebaker Drivers Club Forum made mention of an additional procedure worth noting. It's probably one that experienced mechanics take for granted, but I certainly don't fall into that category (and I know some of my readers don't either).

Specifically, the heads should be re-torqued when the engine is cold, and should be loosened slightly before tightening. Says Forum member Mike Van Veghten:
Always cold...at least 4 hours since the engine was run, cold.

This is important because the Shop Manual gives conflicting instructions, saying that one should warm up the engine "to stabilise the temperature" before checking head bolt torque. Mike explains that this is outdated thinking, and the reason to torque when cold is simple: the first few bolts torqued after running the engine will be to spec, but the engine immediately starts to cool, causing the metal to begin contracting. Bolts torqued after this process begins will be tightened to a different value than the first bolts you worked on!

Therefore, all bolts should be torqued to spec only when the fastened assemblies are cold. This includes valve adjusters.

Furthermore, Mike says:
Back each fastener out about 1/2 turn (one at a time), then re-tighten to the proper torque value. If you do not back the fastener out, you will not get the proper final torque put into the new tightening operation.

Now (as the saying goes), you know... the rest of the story!

Labels: , ,

Tuesday, September 14, 2010

The Truth About Larks.

There's a really great car blog I read called The Truth About Cars. It's full of insider observations and commentary on the auto industry, as well as contributions about things mechanical and older autos.

One of TTAC's regular columns is called "Curbside Classics", wherein contributor Paul Niedermeyer finds and photographs older rides in and around his home in Eugene, Oregon. A couple of weeks back, Paul turned his attention to one of our beloved Larks, specifically a Pepto-Bismol-pink '60 Lark VI 4-door sedan. It's a great little car, and a great review too, with plenty of history and some hilarious personal anecdotes as well. Check it out!

Labels: ,

Tuesday, September 07, 2010

Oil Breather Caps for late Studebaker engines

When you're detailing an engine, it's the little stuff that makes the difference. Decals are one thing that contribute, as are correct engine accessories. In my case, the oil breather/filler caps were one of the last things to need touching.

Studebaker converted to full-flow engines (that is, an engine where 100% of the lubricating oil is filtered) in late 1962. Prior to that, Stude V-8s were partial flow engines, meaning that not all the oil was filtered as it passed through the oiling system. The two engine types can be immediately identified by the location of the oil filler tubes and the valve cover design: partial flow engines have a filler standpipe front-and-center, forward of the valley cover, and the valve covers have no filler openings. Full-flow engines have oil fillers in the valve covers  and no standpipe on the block.

Compare the two photos below to see the difference: On the left is a V-8 installed in a '62 Lark; its central oil fill and solid valve covers mark it as a partial flow engine, while the '63 engine compartment on the left has the dual valve-cover-mounted fillers of a full-flow engine.


Regardless of the type of engine installed, notice that the oil filler cap is the same in each photo: a low-profile orange cap with a blue and white label. This cap, painted orange, was used on all standard '62 - '64 Studebaker engines. A chromed version was used on Jet Thrust engines installed in all Avantis, or on Larks and Hawks that had an optional JT engine. In fact, I believe the basic design of this cap dates back to the very beginnings of the Studebaker V-8; the photo below shows a cap of similar (if not identical) design installed atop the oil filler of a pristine 7,400-mile 1951 Commander State sedan.


Nevertheless, if your cap is missing, it is available as a reproduction from Studebaker vendors - but only with the chromed finish. I don't know why they don't offer a painted version, since there were far more non-JT engines produced over the years, but there it is. So if you have a pair, re-use them! Or get a used pair cheap, wash them up and refurb. Here's the quick-and-dirty makeover.

When I acquired Barney, his OEM Stude breathers were already long gone, ditched in favor of a set of Mr. Gasket chromies. These work find and look OK, but they sit high; the Stude breathers snuggle down over the filler pipe and sit close to the valve covers. So I procured a used set from an SDC Forum user and proceeded to strip off the old paint. The photo here shows an original breather alongside its twin, paint removed using a nylon abrasive wheel.

After the old paint's gone, the new goes on. The secret here is to use Dupli-Color DE1620, better known as Chevy Orange. It's a perfect match for the orange paint Studebaker used in several places under the hood on late V-8s. I always use a base-coat of Rust-Oleum red primer just to even things out; after that, the Orange goes on.

Not a bad result! This is after a coat of primer and two coats of Orange. Now the finishing touch: the decals. These are correct for 1961-1964 caps; older ones were painted only solid colors. The decals are basically STP advertisements (Studebaker acquired STP in '61 as the Corporation began to diversify). These labels are reproduced and can be gotten from Studebaker vendors.

There was some discussion on the Forum a while back as to which direction these labels were applied; some maintained that they went on so that the lettering could be read correctly with the cap installed; others swore that the labels were put on upside-down at the factory. I prefer mine right-side-up, so that's the way I put them on. It just makes sense that way, to me! The labels are self-adhesive, so no wetting and sliding of decals is needed. Here are the completed caps, ready to go.


Above are before-and-after shots of Barney's engine. On the left, the Mr. Gasket breathers. As I said, they're not bad. On the right, the newly-refurbed Studebaker caps. Notice how they hug the valve covers. Also, you can see in the photo below, the Dupli-Color orange really is a perfect match for the OEM paint: the Viscous Drive fan in the photo has factory-original paint and the difference, to my eye, is nil.


Happy Studebakering!

Labels: , , , ,

Saturday, March 20, 2010

Safety first... or, at last.

Today I finally got a few minutes to do something I should have done a long time ago - install a proper set of seat belts in Barney.

There was already a set in there, but they may as well have been absent. They were installed in such a way as to be pretty much useless, had there been any sort of  accident. Seat Belts should always be anchored directly to the floor, with precautions to make certain they can't pull loose when stressed.

As you can see, mine were worthless - one side fastened under the seat-to-floor attaching bolt, the other even worse: screwed to the seat frame itself using a skinny little 1/2" #6 screw. Like I said, worthless. Luckily, adding proper seat belts to a Studebaker model year 1962 or newer is pretty easy, as the Federal government mandated that automakers include provisions for seat belt installation on all cars, whether they were optioned with belts or not. This makes installing belts simple.

So let's get to work! First slide the front seat as far forward as it will go, then flip up the back seat and pull the carpet forward. See those two small rubber plugs about the middle of the photo? Those are the Lark's built-in seat belt anchors. The plugs protect the cage nuts on the other side of the floor; once they're pulled, we can screw in the belt anchor hardware.

I used a flat bladed scraper to pull up the plugs (which came out in two pieces), revealing virgin 50-year-old machine threads ready for use. Sweet! Don't worry if the plugs come out in two pieces (mine did); you won't be using them again. Although I couldn't bring myself to throw out the intact ones; I doubt if even the SASCO inventory included any of these.

If your car is undercoated, however, you may have to do a little spelunking underneath before you can proceed. Here's what mine looked like: covered with undercoat and barely visible. Looks tougher than it is, though; a little scraping and it was ready for use.

One more thing, though - gotta cut the carpet. First slice the jute underlay, then make a discreet slit in the carpet. Not too much - just feel for the bolt hole with your fingers, then put a little "x" right in it. That'll be plenty for our purposes.

My seat belts (a Christmas gift from my lovely wife, purchased from Studebaker International) came with all the hardware needed to attach them to the Stude mounting lugs.

The big eye bolt threads into the floor mounting point. Once it's tightened down, the big hardened washer is placed on the threads between the floor and the lock washer and nut. In the event of a sudden shock on the belts, the washer will spread the force against the floor pan, preventing the anchor from tearing out of the floor.

You can see that there's a lot of thread visible underneath once the eye bolt is threaded in. I used a 12" adjustable wrench to tighten the bolts down. Once they're tight, you can put the bottom hardware on, but you may need an assistant to keep the eye bolts from rotating while you tighten the nut from below.

Do the same for the other 3 eye bolts (assuming you're installing a pair of belts), and you're ready to attach the belts. There is no torque value given in the Shop Manual for these anchor nuts, so just tighten them down as tight as they'll go. A little bit of Loctite Blue wouldn't be a bad idea either.

At this point, my installation took a little bit of a side trip. The outboard anchor on the passenger's side was located closer to the frame rail than the one on the driver's side, and the big washer would not clear it -- there was a quarter-inch too much washer.

So I improvised a little and stuck the washer in a vise, and used my Dremel and a cutoff disc to remove enough material to let the washer fit. After this was done, it slipped over the eye bolt and snugged up against the frame like it was born that way. The inboard cage nut in the floor was a little recalcitrant too - I needed to chase the threads with a tap, and even then it took a lot of grunting and sweating, a half-turn at a time, to get the eye bolt home.

After all the hardware is snugly attached, you can install the belts. Generally, the belts with the buckle assembly are mounted inboard; the bayonets are outboard. Thread them through the gap between the seatback and lower bolster. Each belt end has an opposing set of J-hooks that clamp to an eye-bolt, and are then held together with a cotter pin. It doesn't matter which way the cotter pin goes in, but I recommend orienting it so that the spread ends face the carpet, for cosmetic reasons.

You're done! Put the seat back to driving position, adjust those slick new belts, and head for the road! You're about 100 times safer now than you were an hour ago.

Labels: , ,

Thursday, December 03, 2009

Another reason I love Studebakers.

One comment you always seem to get when people find out you own a Studebaker is "Boy! I bet parts are hard to get!" But reality is exactly the opposite -- Studes have one of the best supplies of NOS and reproduced parts of any American carmaker. Sure, there are soft trim items and model-specific bits that can be hard to come by (I'm still looking for an NOS right backup light lens for Barney, in case you have one!), but by-and-large, it's less hassle getting parts for my Lark than for, say, a '62 Grand Prix, a '64 Falcon or a '66 Ambassador Classic.


Case in point: after my recent re-wiring job, it dawned on me that the only bits of wire in the car that were still original were the headlight and front turn signal leads. So I opened my trusty Studebaker International catalog and found both headlight leads and front indicator assemblies (the entire lamp bucket with attached leads). Popped in my credit card and 7 days later, the mailman delivered, fresh in the factory parts envelopes, NOS parts for everything I'd ordered.

This isn't an isolated occurrence, either - I've ordered and received many NOS parts from Stude vendors in the last three years. Now, I ask you, what other marque has that kind of original parts availability? By contrast, the last OEM part I was able to get for my '67 Pontiac LeMans was the driver's door mirror, which I ordered through my local Pontiac dealer's parts department. And it was crappy - the molds were so old and degraded that I couldn't drive the car over 30 MPH without the mirror flopping over to point at the pavement.

So if questions about parts availability is keeping you from buying a Studebaker - don't worry. Somewhere, what you need is out there, and more than likely still in a factory package.

If you're looking for parts you can't find from one of the vendors at StudebakerVendors.com, try the following:
  • Studebaker Swap, a forum-based place to post wants and items for sale.
  • The Studebaker Parts Swap Page, a bulletin-board swap spot that's been up for a long while.
  • The parts swap boards of Sonny's Racing Studebakers! forum, a cool site dedicated to Studebaker performance.
  • If you've got another place you like, let me know and I'll add it here!

Labels: ,

Monday, November 30, 2009

Heater Valve Rebuild Service.


Got a leaky heater valve in your car, dripping water down the firewall and soaking the carpet? Stuck using a "replacement" valve that operates backward from normal? Or is your valve just frozen, unable to open or, worse, halfway open and heating the passenger compartment to uncomfortable levels?

Either way, something needs to be done. It so happens that your old Harrison or Ranco valves are rebuildable, if they're not too far gone, and Jim Tucker provides that service.Studebaker's Climatizer heating system used Ranco valves, which up until recently were not available new, and even now the repros are not cheap. Check out his website at www.heatercontrolvalve.com - fix the valve and save your floorboards!

Labels: ,

Friday, September 04, 2009

Spring has sprung.

Distributor advance weight springs are one of those things that get neglected, but should be replaced every now and then, simply because they are, after all, springs -- they will eventually stretch.

Whilst rebuilding a Delco distributor for Barney, it was obvious I'd need new springs, so I went down to Smokey's Speed Shop (Smokey as in Yunick - yes, the legend himself opened up a shop in Oceanside years ago) and got a Mr. Gasket #928G Advance Spring Kit. This kit contains 3 sets of springs for Delco distributors -- but absolutely no instructions. Checking the Mr. Gasket website doesn't help either; they have no instruction sheets online like Crane or Moroso do.

Finally, after an extensive Google search, I came up with the way to tell the 3 sets of springs apart, and am posting it here in hopes that some other poor soul looking for this info will have an easier time of it.

Mr. Gasket 928G Spring Weight Decoder:

  • Gold springs = Heavy (OEM style, slowest advance)
  • Silver springs = Medium (faster advance)
  • Black springs = Light (fastest advance)
From yet another website, here's a chart that explains when the centrifugal advance will kick in for each set of springs used (click on it to see full-size):

To Mr. Gasket and the Prestolite Corporation: Love your products, hate your documentation.

Labels: , , ,

Thursday, September 03, 2009

A drive to Perris.

Back in the day, when I spent my days spinning 45s and playing used-car commercials, I worked at a radio station whose promotions were so chronically low-budget that we used to joke amongst ourselves that (insert big-voiced announcer here) "We're sending lucky listeners on an all-expense-paid trip to beautiful PARIS! [Long pause......] California!"

Of course, this other Perris is spelled a mite different. It's in what's referred to as Southern California's Inland Empire, the cities and towns that make up Riverside County, just east of Los Angeles and north of San Diego Counties.

Tuesday, when my buddy Kirk found that my distributor was toastier than an English muffin (see Good News, Bad News...), I posted a cry for help on the SDC Forum, asking for assistance in finding a new distrib for Barney. Within an hour, I had two offers of a free unit! Dean Pearson in Murrieta offered one up but it turned out to be for a '51 V-8. But then Warren Webb in Perris said he had one which would fit my car that I could have just for coming and getting it. Woot!

So we connected by phone and I made plans to run up the next day. Perris is about an hour's drive from Oceanside - not a big deal. After dropping Reed as school on Tuesday, I hit the road and arrived at Warren's place around 8:45.

Warren is a cool guy, with cars in his blood. His dad was the body shop manager for a Pontiac dealer on the East Coast, so he grew up around cars and learned the paint & body trade. He became interested in Studebakers when the Avanti hit the news, but is first Stude was a '59 Lark VI 4-door with a straight 3-speed that came to the dealer as a trade.

With a mutual love of Studebakers and Pontiacs, we had a lot to talk about and spent about 2 hours shooting the breeze (or should I say "chasing the shade" - it was hot!). Warren has quite a few Studes - on the property he's got a '63 Avanti, '63 GT Hawk (R-2 powered!), '62 Lark Daytona convertible, '60 Lark VIII convertible, '66 Daytona 2-door, '68 Pontiac LeMans convertible, '62 Champ pickup, and '67 Barracuda notchback -- my favorite Q-body of all time!

Warren was kind enough to give me a Delco window-type distributor from a '61 engine, which I've begun to refurb. It'll go in Barney to replace the ailing Prestolite that's apparently falling apart as we speak.

It was a great visit, and Warren is a very cool guy. I enjoyed the time immensely and, after we'd said our goodbyes and snapped a couple of pix, headed for home thinking (once again!) how the Studebaker brotherhood is the neatest bunch of car guys I've ever met. Thanks again, Warren!

Labels: ,

Wednesday, August 26, 2009

Rust buster!

Last weekend I got something done (yay!)... I pulled the heater out of Barney. Bad news was: the core had leaked and the fan really was shot (boo!). I hooked the fan motor up to my battery charger and, on the 10 amp setting, it would not budge... took the 50 amp setting to get it spinning! And even then it sounded like the bearings were very pissed at me for making them... well, bear.

So I am now embarked on rebuilding the heater, and therein lies a tale, one of mild alkali, electricity and rust removal.

The squirrel-cage blower fan had rusted (no! really?) and although they're still available, $30 made the CASO* in me squirm. I remembered an article I'd read about electrolytic de-rusting, and decided to give it a spin.

The gist is this: you take a plastic bucket, pour in a couple gallons of water, add 1 tablespoon of baking soda (or washing soda) and stir. Then, you connect the positive side of a power source (like a battery charger) to a steel or iron object immersed in the bucket, and the negative side to the object you wish to de-rust. Switch on, let it bubble for a few hours, and voila! clean metal. Well, un-rusty metal - you still have to scrub off the black coating left behind by the process.

You can read a much more detailed explanation on the Stovebolt Forum.

So, last night, in went the squirrel cage. And this morning, out it came, with nearly all of the rust banished.

Oh, and don't worry about the filthy mess in the bucket after you're done - all it is, is iron oxide, baking soda and whatever other sludge your part may have had on it.

As I write this, the blower housing is soaking in the bath, and I have ordered a new fan motor and miscellaneous other parts from SASCO. Look for the step-by-step heater repair post coming soon!


*CASO: commonly-used acronym, stands for "Cheap-ass Studebaker owner". Can be a term of endearment, or not - use carefully!

Labels: , ,

Tuesday, August 11, 2009

Be safe!

One of the hazards of working around old cars is the constant exposure to evil substances. Things that will rot your internal organs, turn your skin different colors or even kill you. It's no laughing matter; the chemicals involved with cleaning, painting, assembling and restoring vehicles can be nasty things. And we've got warning labels on so many things these days (coffee cups: "Caution: Contents Hot") that we tend to ignore them now simply because of overload.

But the consequences of exposure can be severe. Do yourself a favor and read this first-person account of just how wrong things can go - the author was exposed to a minute amount of superheated brake cleaner, and is lucky to be alive - although the damage done to his kidneys, pancreas and lungs will shorten his lifespan dramatically.

Safety's no joke. Read the labels, protect yourself. No short cut is worth your life.

Labels:

Sunday, July 12, 2009

Gaskets!

A while back I noticed a lot of rust on the outside surfaces of my backup lights. These lights are a one-year design (1963) and so the bits are a little hard to come by. However, I found a pair on eBay.

When I pulled the lenses off, I found that no interior gaskets were mounted in the backup lights, letting water run right into them and rust them out. In the first pic, you can see the results - the old lamp bodies are badly rusted and, while operable, are certainly not very nice.

People often forget to put new gaskets in when replacing lenses and such, and the original die-cut material was a gray rubbery composition that deteriorated badly. It would often dry up and crack, leaving the interior vulnerable to moisture.

Fortunately, new die-cut gaskets are available from most Studebaker vendors. These are made of modern expanded-cell foam materials that compress nicely and resist deterioration. It's easy to install; simply scrape out the old adhesive and bits of gasket, and run a bead of 3M Black Super Weatherstrip Adhesive (available at any body or paint supply shop, or online). Then press in the new gasket; the 3M adhesive sets fairly rapidly and you can install the new part nearly immediately.

There's one other gasket too - the one between the lamp body and the car body. Amateurs often leave these off, which allows vibration to rub the two parts together and wear off paint and metal, allowing rust to start unseen between surfaces. These gaskets are also available from your favorite friendly Studebaker vendor. Again, the older gaskets are usually a rubber compound that deteriorates; the new ones are modern foam. This does not need adhesive; it simply is sandwiched between the lamp and body.

Labels: , ,

Wednesday, May 27, 2009

Don't tighten the bolts until you're sure!

OK, I'm a moron. I've always known this, but just had it reconfirmed.

My son and I went out last Saturday to reinstall the hood on Barney. I was smart - I'd marked the location of the hinges by outlining them with Sharpie before I removed the hood. So all I had to do was match the hinges up to the marks on the hood and bolt 'er down.

Here's where the moron part occurs. I forgot to allow for the 1/16" of gap between the nib of the pen and the actual placement of the hinge. So my boy held the hood in place while I tightened things up and then gently closed it. Can you guess what happened?

The hood was aligned 1/16" too far back. So when I tried to raise it again it snugged up against the cowl and would not open.

I tried tugging on it from the front to try and skooch it forward. No go, I'd tightened the bolts just a little too much. I tried running a plastic Bondo spreader in the gap, hoping to coerce the metal of the hood UP. No go. I tried sticking a long board in the opening between the grille header and the hood to push the hood up from the inside. Similar results. And of course there's no way to loosen those bolts from the engine compartment, even if you could get an appendage up that far from underneath. I had visions of having to cut the hood off at the corners...

Thank God the body gaps in Studebakers are so wide, for that was the only thing that saved me. It occurred to me that the sheet metal "wrench" on my Skil circular saw was the same size as the bolt head. So I flattened it with a couple of sledge blows and levered it in the gap between hood and fender. Got it! a few turns on all four and the hood slid forward enough to lift it without damage.

So let my stupidity be a lesson to any other rubes and noobs reading this: never tighten 'em down until you're sure the alignment is right. I escaped with just a barely noticeable kink in the hood where it meets the cowl, but it could easily have been much worse.

I posted this at the Studebaker Forum, to which Jeff Rice (owner of one of the sweetest trucks ever, a yellow custom '37 Coupe Express), posted a simple, elegant solution:

Next time, when disassembling, try drilling a lil' 1/8" alignment hole and stick the drill bit in there to use as an alignment pin on reassembly. Dab of filler in the hole and a touch up and no one will ever know...

Thanks Jeff!

Labels: ,

Thursday, October 23, 2008

Checking specific gravity on a sealed battery

While I was sussing out my battery troubles, I came across a formula to calculate the specific gravity of a sealed battery (an indication of the water-to-acid ratio in the cells, which indicates its state of charge. You used to be able to perform this test with a hydrometer on open-cell batteries, but those days are gone. So, just for reference, here is the process:

  1. Disconnect the battery cables.
  2. Measure the voltage between the posts.
  3. Divide the voltage reading by 6 and then subtract 0.85 from the product.
So, say you measured 12.6 volts at the posts. Dividing by 6 equals 2.1. Subtract 0.85 and the result is 1.25, is the specific gravity of the battery.

The Studebaker Shop Manual helpfully lists what the specific gravity test reveals:
  • 1.260 = Fully charged.
  • 1.220 = 75% charged.
  • 1.170 = 50% charged.
  • 1.120 = 25% charged.
  • 1.070 = Discharged.
The manual also suggests that any battery that measures below 1.220 specific gravity should be recharged.

Labels: , ,